- Products
- Acoustic Guitar Ample Guitar SJ Ample Guitar Twelve Ample Guitar L Ample Guitar T Ample Guitar M Ample China Ample China TP 4 Ample China Konghou 4 Ample China Guqin Ample China Erhu Ample China Dadi Ample China Dongxiao Ample China Qudi Ample China Zheng 4 Ample China Pipa Electric Guitar Ample Guitar WF Ample Guitar RB Ample Guitar Vintage Cherry Ample Guitar Semi Hollow Ample Guitar TC Ample Guitar Peregrine Falcon Ample Guitar SC Ample Guitar LP
- Metal Series Ample Metal Hellrazer Ample Metal Eclipse Ample Metal Ray5 Acoustic Bass Ample Bass Upright Ample Bass Acoustic Electric Bass Ample Bass TR6 Ample Bass Jaco Fretless Ample Bass Yinyang Ample Bass J Ample Bass P Ethno Series Ample Slide Lapsteel Ample Ethno Banjo Ample Ethno Ukulele Free Software Ample Percussion Cloudrum Ample Guitar M Lite Ample Bass P Lite
- Purchase
- Purchase Purchase Products Redeem Products
- Support
- Support News Review Forum About Us Manual iLok Activation EULA
- Manual Installation and Activation China Series Activation FX Manual Settings and CPC Ample China Settings and CPC Sample Editor Manual Bass Manual Ample Bass TR6 Manual Ample Bass JF Manual Ample Bass P Manual Ample Bass J Manual Ample Bass Yinyang Manual Ample Metal Ray5 Manual Ample Bass Upright Manual Ample Bass Acoustic Manual Bass Amp Manual Bass Riffer 4 Manual Bass Tab Reader Manual Chinese Series Manual Ample China TP Manual Ample China Konghou Manual Ample China Guqin Manual Ample China Erhu Manual Ample China Dadi Manual Ample China Dongxiao Manual Ample China Qudi Manual Ample China Zheng Manual Ample China Pipa Manual Ample China Riffer Manual Riffer Piano Manual Ample Percussion Manual
- Guitar Manual Ample Guitar WF Manual Ample Guitar RB Manual Ample Guitar VC Manual Ample Metal Hellrazer Manual Ample Guitar SC Manual Ample Guitar LP Manual Ample Guitar PF Manual Ample Guitar TC Manual Ample Guitar SH Manual Ample Metal Eclipse Manual Ample Guitar SJ Manual Ample Guitar M Manual Ample Guitar T Manual Ample Guitar L Manual Ample Guitar Twelve Manual Guitar AMP Manual Guitar Riffer 4 Manual Guitar Strummer Manual Guitar Tab Reader Manual Ethno Series Manuals Ample Slide Lapsteel Manual Ample Ethno Banjo Manual Ample Ethno Ukulele Manual Tutorial Videos Reverend Tutorial Videos Play Ample Guitar on Keyboard Protools Expert Video
- Download
- Myamplesound
1.1 Installation on MacOS
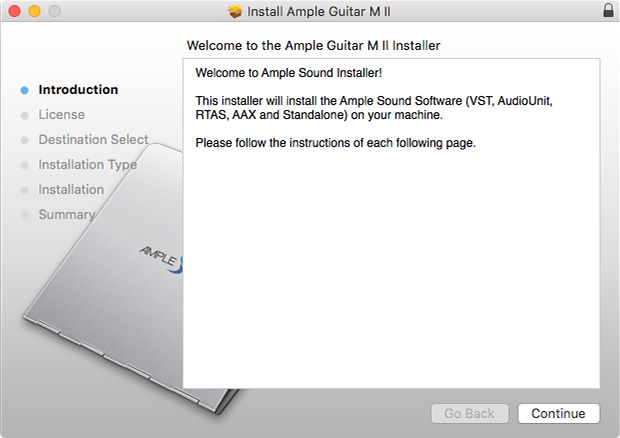
1. Continue to install.
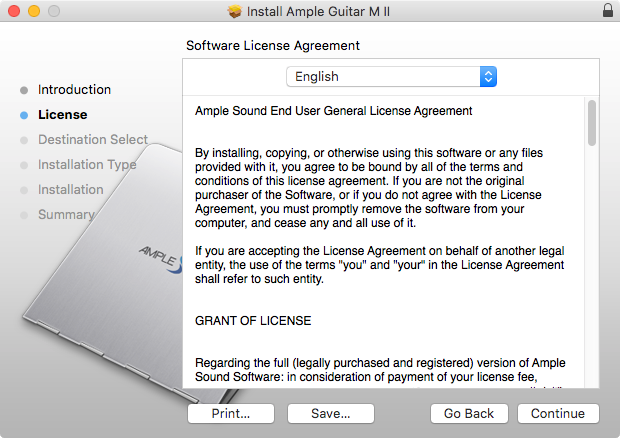
2. Read and accept the license agreement.
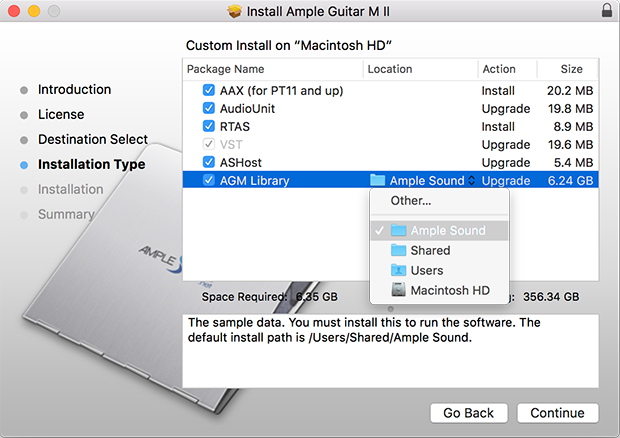
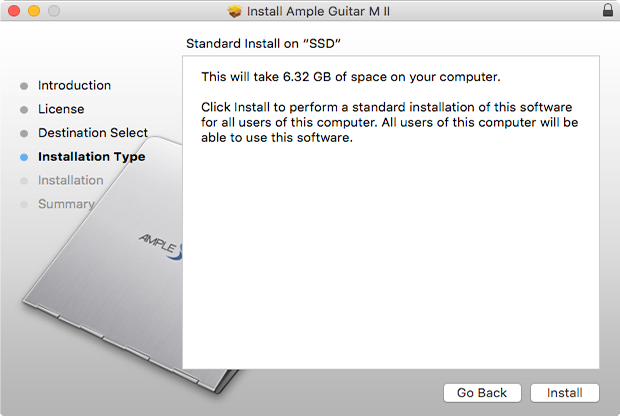
3. Select plugin formats to install. Change Location if you want to install sample library in a different place.
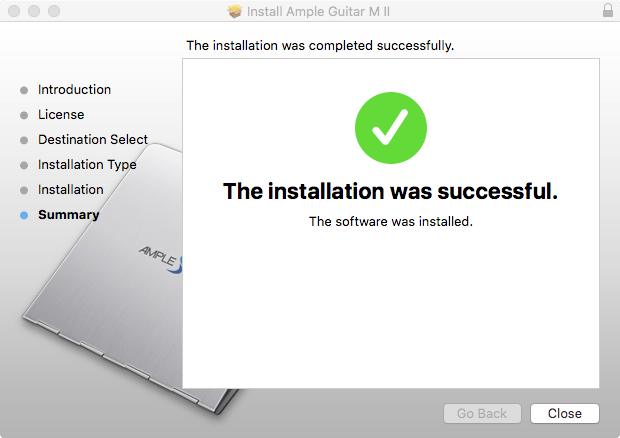
4. Close to exit.
1.2 Installation on Windows
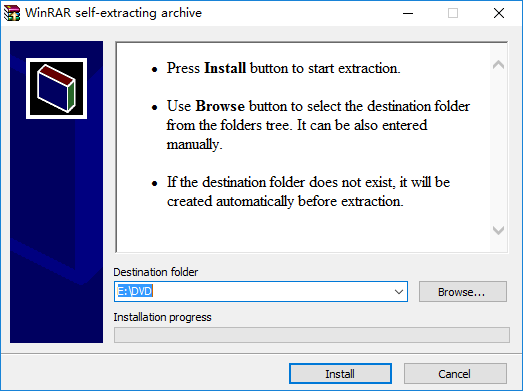
1. Extract installer.
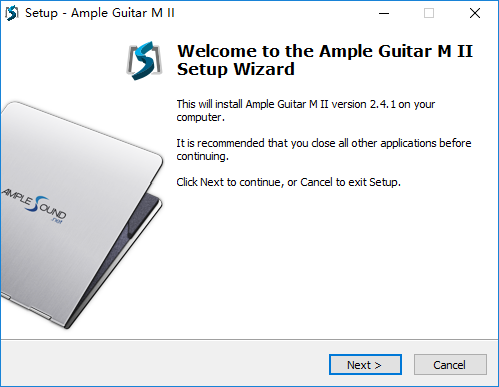
2. Continue to install.
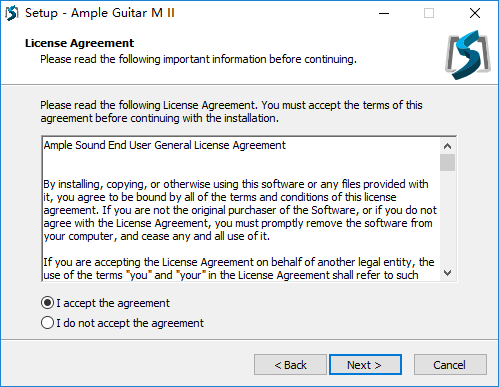
3. Read and accept the license agreement.
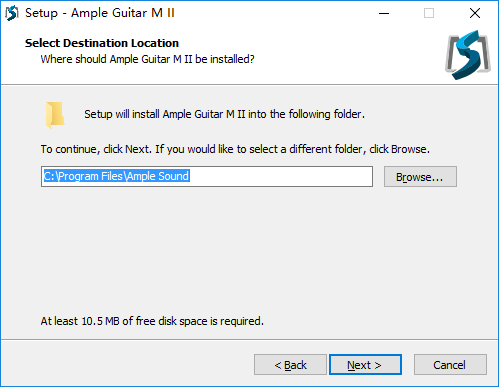
4. Specify location to install standalone.
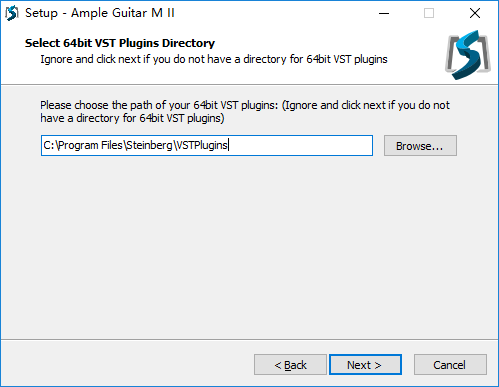
5. Specify location to install 64bit VST.
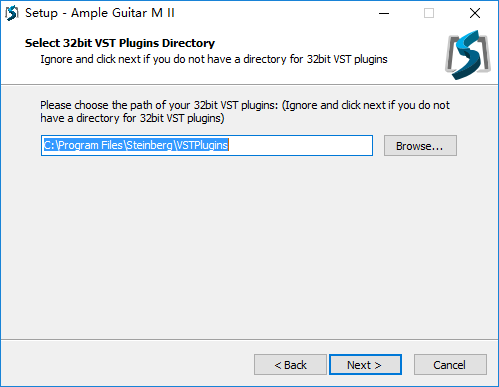
6. Specify location to install 32bit VST.
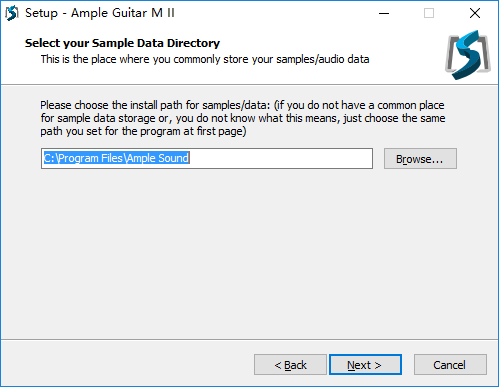
7. Specify location to install sample library.
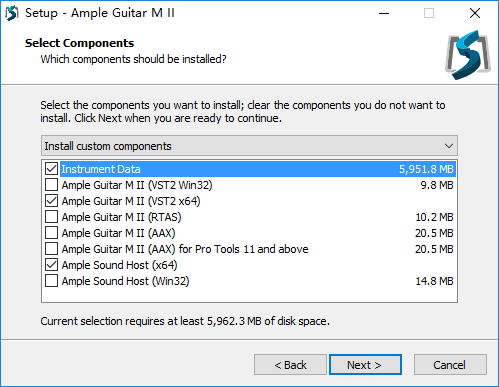
8. Select plugin formats to install.
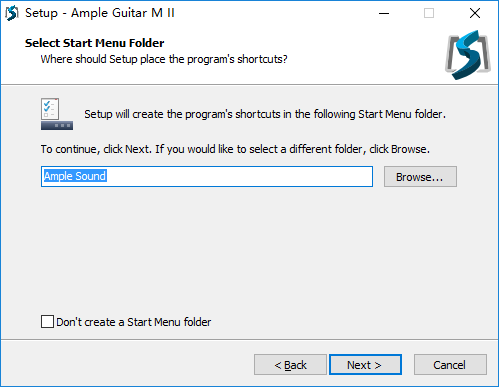
9. Choose if to create a Start Menu folder.
10. Finish to exit.

Microsoft official download page
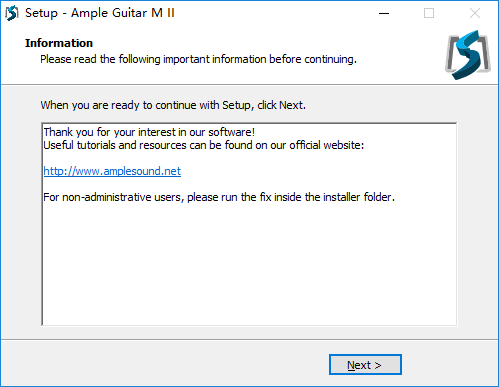
* Please install Microsoft Visual C++ 2010 Redistributable if program can not run.
* If encountered with error shown above, please close and simply ignore it.
1.3 Activation
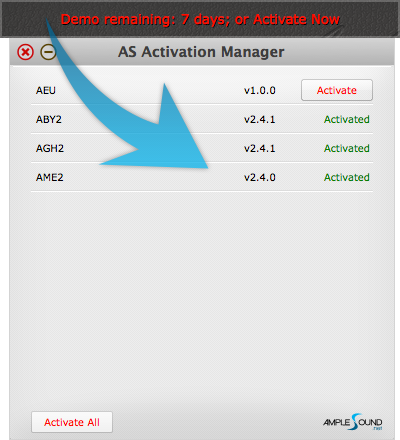
1. 7-days trial with full features is offered.
2. Trial requires an internet connection.
3. Open Activation Manager to activate products, You can activate all of Ample Guitar with one time activation.
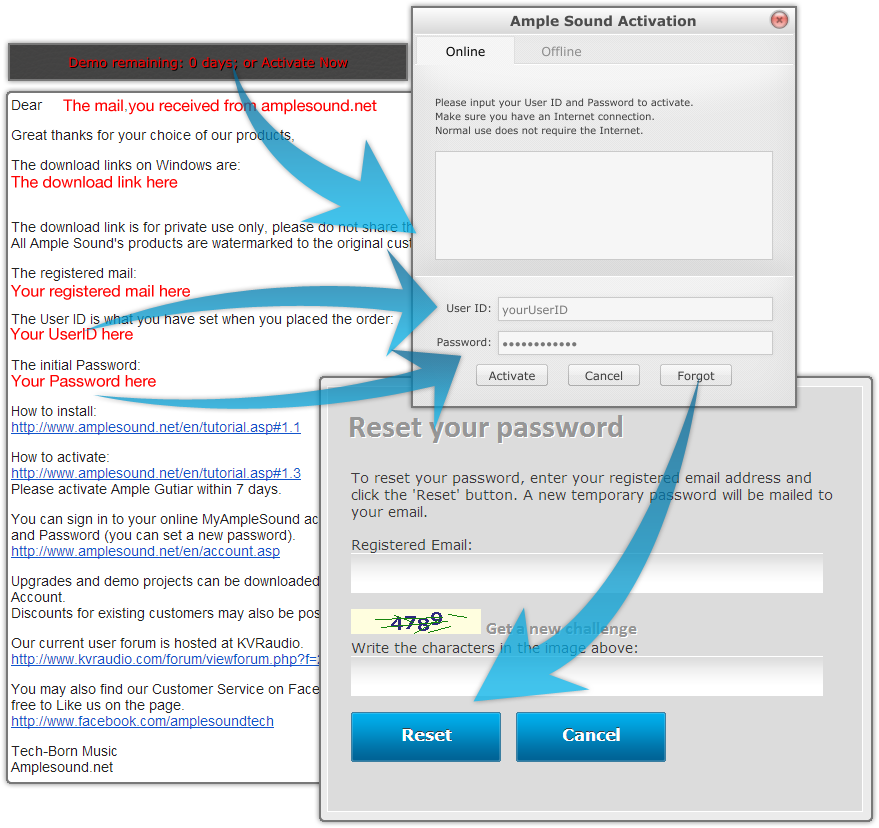
4. Online Activation: fill in User ID and password and click "Activate" to complete activation. Click "Forgot" if you want to inquire User ID and reset password.
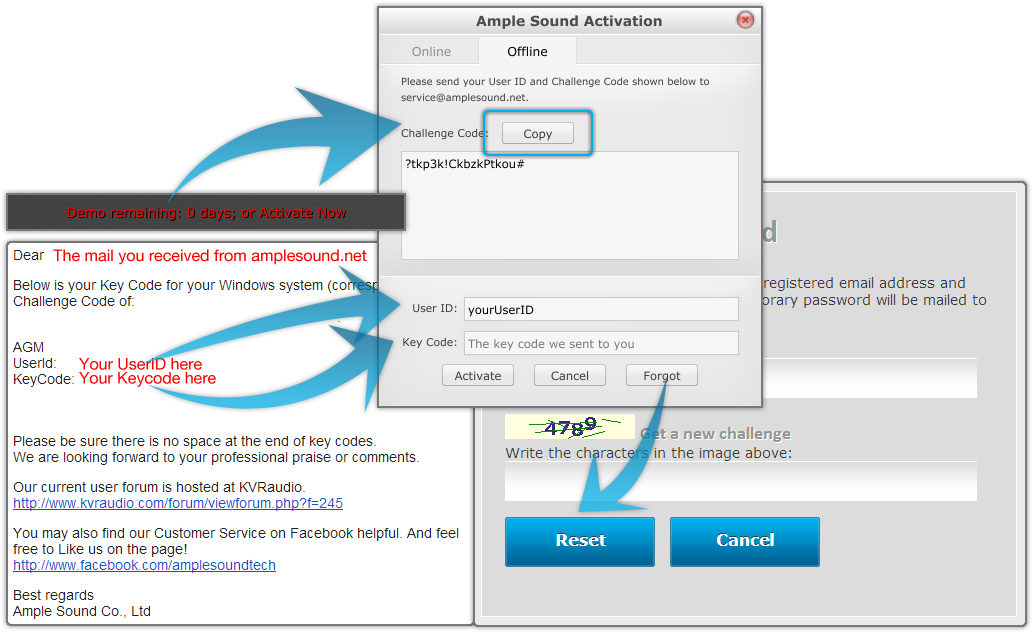
5. Offline Activation: please send Challenge Code and User ID to service@amplesound.net. Our customer service will send you Key Code within 24 hours. Fill in User ID and Key Code and click "Activate" to complete activation. Keep your User ID and Key Code in case of reinstallation.
6. After activation succeeds, please close Activation Manager and restart program.
Video tutorial on Youtube
2.1 Overview of Setting Panel
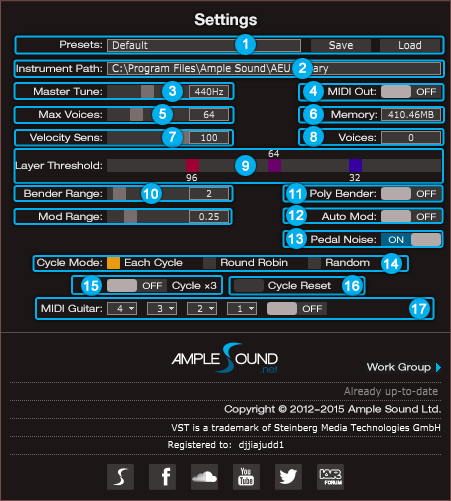
- Save/Load Preset
- Instrument Path Setting
- Master Tune
- MIDI Out
- Max Voices
- Real Time Memory Display
- Velocity Sensitivity
- Real Time Voices Display
- Velocity Layer Thresholds
- Bender Range
- Poly Bender
- Mod Wheel Range
- Auto Mod Wheel
- Hold Pedal Noise
- Cycle Mode
- Cycle*3 and Cycle Reset
- MIDI Guitar Mode Setting and Toggle
2.2 Save/Load Preset
You can save your current parameters setting as local file for later use with other projects or DAWs.
2.3 Instrument Path Setting
You can move sample library folder indicated by original path to anywhere you want, and set path to new location.

2.4 Master Tune
Default tune is in 440Hz. You can set tune to any non-standard between 430 and 450Hz.
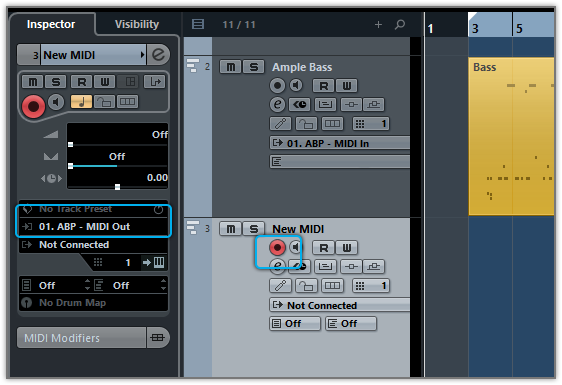
2.5 MIDI Out
Toggle on MIDI Out, add a MIDI track in project and set the input to MIDI Out of Ample Guitar. Then any note being played will be converted to MIDI, including those by strum and tab.
* Logic is the only one DAW which doesn't support MIDI out feature.
2.6 Max Voices
Defines the maximum number of voices which can be played simultaneously. Voices will be forced stop if the number goes beyond maximum.
2.7 Velocity Layers
Rhombic Sampling Structure: Greatly improves sample utilization proficiency.
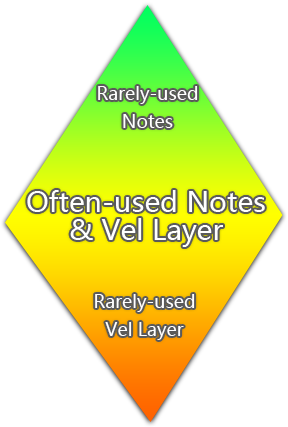
Sliders control velocity thresholds of corresponding layers. Adjust them according to your play style.
2.9 Cycle Mode
You can switch cycle mode among Each Cycle (default), Round Robin and Random.
Each Cycle: Separate sample cycle for each note and each velocity layer, more appropriate for ARP and Strum.
Round Robin: more appropriate for Solo.
Random: Sample Cycle random
2.10 Cycle*3 and Cycle Reset
Cycle*3: When toggled on, 3 times cycles will be available for each note.
Cycle Reset: You can reset cycle index here.
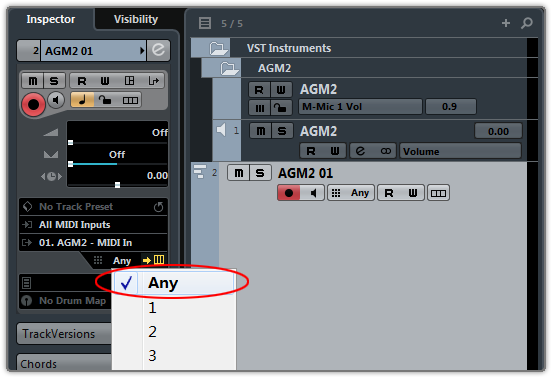
2.11 MIDI Guitar Mode Setting and Toggle
Toggle on when you use midi guitar as input. Make sure the input channel of midi track is set to all.
2.12 Customized Parameters Control
2.12.1 MIDI Controller
All buttons, knobs and sliders on GUI can be controlled by MIDI Controllers. Alt + click or right-click a control to open the dialog below and assign a controller.
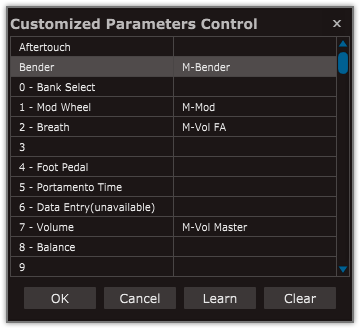
- Left Column: Available controllers, including After Touch, Bender and MIDI CC.
- Right Column: Assigned parameters.
- OK: Assign the selected controller to the control.
- Cancel: Close dialog.
- Learn: MIDI Learn.
- Clear: Clear the assigned controller of the control.
2.12.2 Automation
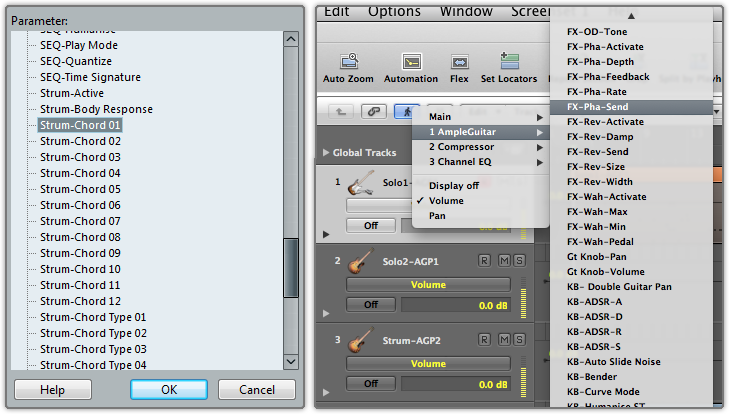
You can also use automation to control parameters.
2.12.3 Tips
Detailed information (tool tips) can be displayed by hovering your mouse over a control.
2.12.4 Fine adjustment & Value reset
Press Shift + click to reset a control to its default value. Press Ctrl and drag the mouse to make fine adjustments.
3.1 Overview of Guitar Panel
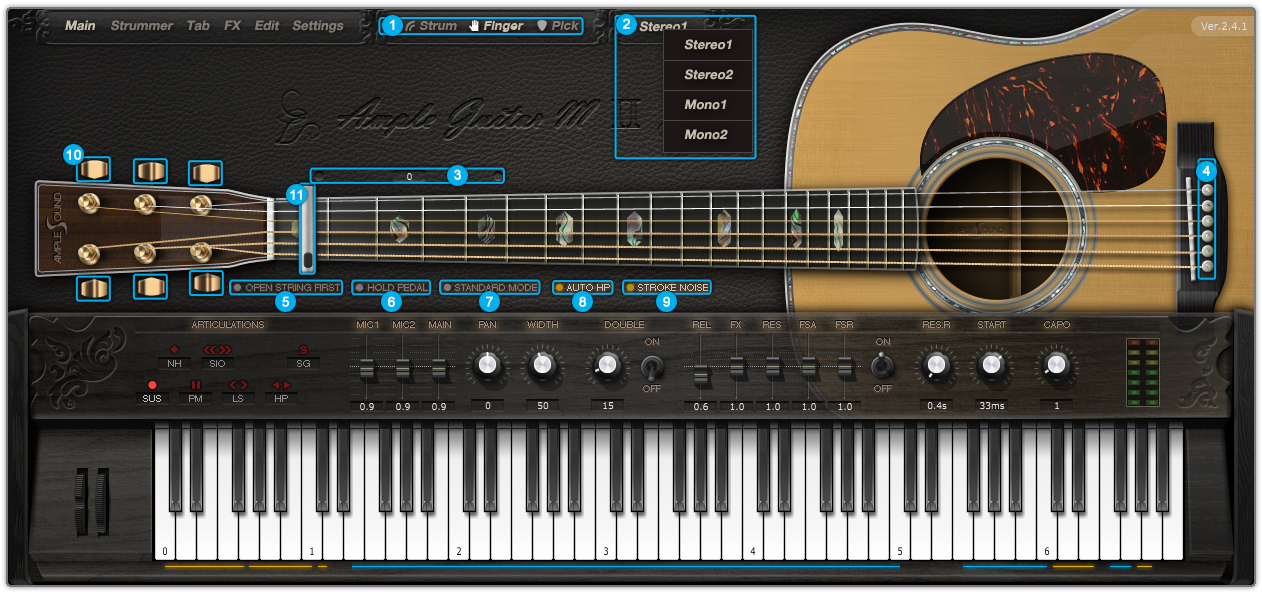
- Sample Library
- Sound Mode
- Capo Logic - Intelligent Fingering Simulation Algorithm
- Strman
- Open String First (G#6)
- Hold Pedal
- Play Mode
- Auto Legato Switch (D#6)
- Stroke Noise
- Alternate Tuner
- Capo
3.2 Sample Library
Acoustics have three distinct sample libraries: Finger, Pick and Strum. Strum library includes real strum samples customizable for any chord and rhythm without loss of quality.
Electrics have sample libraries of three pickup options: Neck, Both and Bridge.

*Sample Library cannot be switched during play.
3.3 Sound Mode (Acoustic only)
Two mono and stereo modes are available. In addition, you can adjust mic volumes, pan and width to meet your need
Preview: Stereo 1, Stereo 2, Mono 1, Mono 2, Width(25%), Width(100%), Mic 1(Volume 1) : Mic 2(Volume 0.5), Mic 1(Volume 0.5) : Mic 2(Volume 1) in order.
3.4 Open String First
Used for high position arpeggios with open strings. When toggled on, notes will be played priory on open strings regardless of Capo Logic. Note G#6 can toggle it on with high velocity and off with low velocity.
Preview: Normal, then Open String.
3.5 Play Mode
When Keyboard Mode is on, multiple notes can be played on same string simultaneously. When Solo Mode is on, only single note can be played. Both Keyboard Mode and Solo Mode will mute Auto Legato.
3.6 Auto Legato Mode
When two notes on same string overlap and Keyboard/Solo Mode is off, a legato will be automatically made. Note D#6 can switch auto legato mode, high velocity for Auto LS and low velocity for Auto HP.
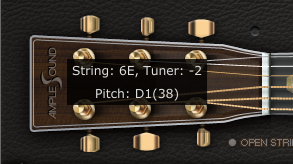
3.8 Tuner
You can tune every string by turning its corresponding tuner, 2 semitones down at most. Tuning is fully compatible with strummer, tab and all articulations.
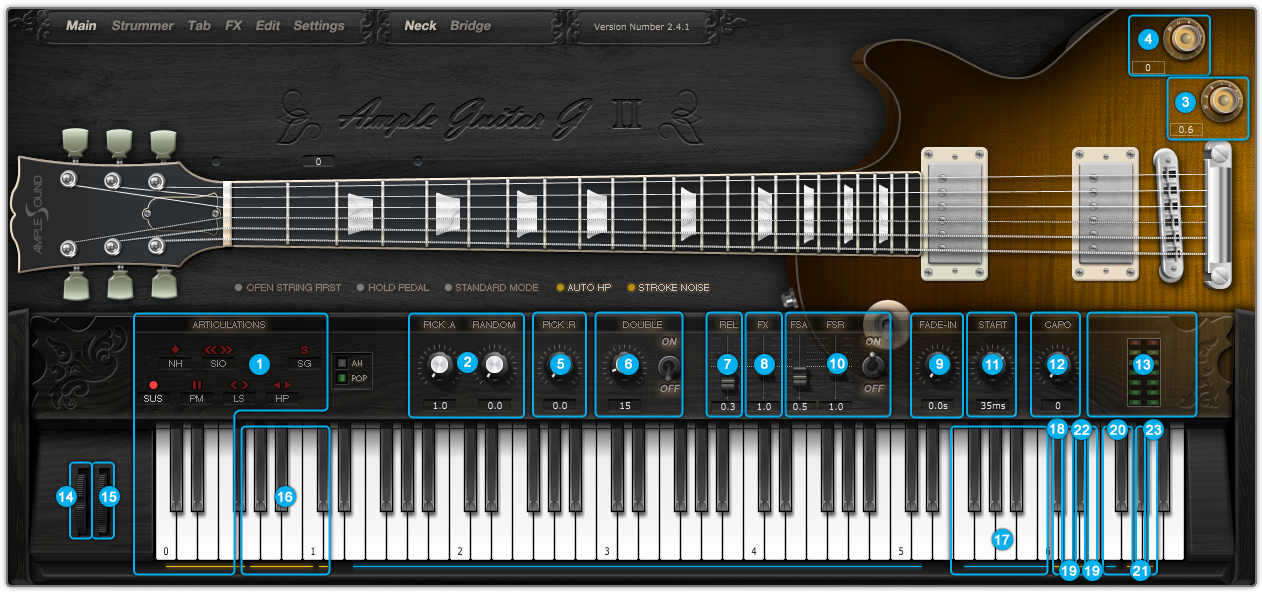
4.1 Overview of Main Panel
4.1.1 Acoustic Guitar
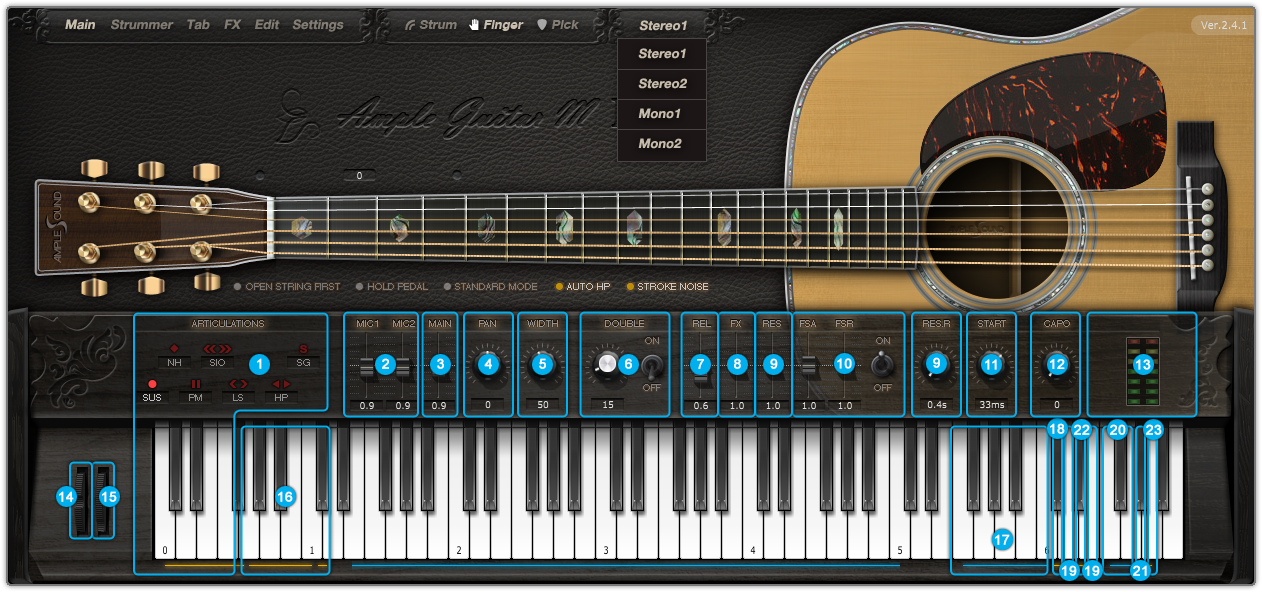
- Articulations and Poly Legato (Important)
- Mic Volume / Pick Attack Accentuation
- Master Volume
- Pan
- Stereo Width
- Doubling Toggle and Width (Important)
- Release Sound Gain
- FX Sound Gain
- Resonance Gain and Time / Fade In (Original)
- Fret Sound Toggle and Gain (Original)
- Global Sample Start Time (Original)
- Capo
- Peak Meter
- Bender
- Manual Vibrato Wheel (Original)
- Strman & Capoman
- FX Sound Group
- Strum Mode Toggle
- Poly Repeater (Original)
- FX Sound Group 2
- Open String First Toggle
- Auto Legato Mode Switch
- Tab Play Toggle
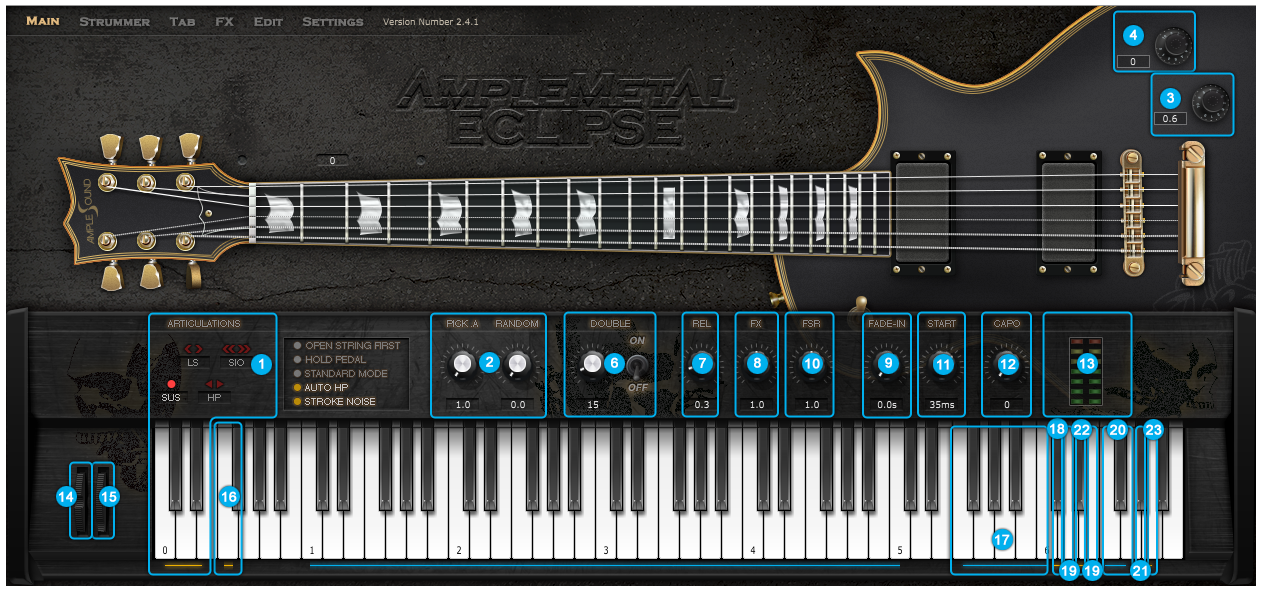
4.1.2 Electric Guitar
4.1.3 Metal Guitar
4.2 Articulations and Poly Legato (Important)
4.2.1 Acoustics and Electrics
| Abbreviation | Name | Keyswitch | Range |
|---|---|---|---|
| Sus | Sustain & Pop (Artificial Harmonic) | C0 | E1 - C5 (D5) |
| NH | Natural Harmonic & Artificial Harmonic | C#0 | E2 - C5 (D5) |
| PM | Palm Mute | D0 | E1 - C5 (D5) |
| SIO | Slide In from below & Slide Out downwards | D#0 | F#1 - C5 (D5) |
| LS | Legato Slide (Poly Legato) | E0 | F1 - C5 (D5) |
| HP | Hammer On, Pull Off (Poly Legato) | F0 | E1 - C5 (D5) |
| SG | Slide Guitar | F#0 | F#1 - C5 (D5) |
4.2.2 Metal
| Abbreviation | Name | Keyswitch | Range |
|---|---|---|---|
| Sus | Sustain, PM & Artificial Harmonic | C0 | C1 - C5 |
| LS | Legato Slide (Poly Legato) | C#0 | C#1 - C5 |
| HP | Hammer On, Pull Off (Poly Legato) | D0 | C1 - C5 |
| SIO | Slide In from below & Slide Out downwards | D#0 | D1 - C5 |
4.2.3 Sustain & Pop (Artificial Harmonic)
Keyswitch is C0. Notes of velocity less than 127 will be Sustain. For acoustics, notes of velocity 127 will be Pop. For electrics, notes of velocity 127 will be either Artificial Harmonic or Pop depending on Accentuate Mode.
4.2.4 Natural Harmonic & Artificial Harmonic
Keyswitch is C#0. For electrics, notes of velocity less than 127 will be Natural Harmonic. Notes of velocity 127 will be Artificial Harmonic.
4.2.5 Palm Mute
Keyswitch is D0. Lower the velocity, greater the mute depth. If you press C0 and D0 at the same time or for Ample Metal Guitars, subsequent notes of high velocity will be Sustain and notes of low velocity will be Palm Mute.
4.2.6 Slide In from below & Slide Out downwards
Keyswitch is D#0. When D#0 is before a note, subsequent note will be Slide In. When D#0 is during a note, Slide Out is triggered whose velocity is determined by D#0. Articulation will revert to Sustain when note ends.
4.2.7 Legato Slide (Poly Legato)
Keyswitch is E0. The two notes must overlap and E0 must be ahead of the start note. Articulation will revert to previous one when destination note ends. Slide triggered by E0 of high velocity will change fret position. Low velocity will not.
Poly Legato: Press the highest note of destination set to slide upwards; Press the lowest note of destination set to slide downwards.
Slidesmoother: The speed of long legato slide (slide more than 2 frets) is determined by the velocity of destination note. Higher the velocity, faster the speed.
Auto Slide: When keyboard/solo mode is off and auto legato mode is Auto LS, two overlapped note on same string will make a slide automatically without keyswitch.
4.2.8 Hammer-On & Pull-Off (Poly Legato)
Keyswitch is F0. The two notes must overlap and F0 must be ahead of the start note. Articulation will return to previous one when destination note ends. HP triggered by F0 of high velocity will change fret position if it goes beyond. Low velocity will not.
Auto HP: Ample Guitar can switch to HP automatically if there is a legato on one string, without pressing a Keyswitch first. if you don't need it, open "keyboard mode".
Poly Legato: The HP Keyswitch can also change the Capo in the same way as LS, Highly-advanced scripting logic enables this feature to select both the correct "capoed" fret and string, to exactly replicate a real guitar performance.
4.2.9 Slide Guitar
Keyswitch is F#0.
4.2.10 Doubled Keyswitches
Press 2 Keyswitches at the same time to get two articulations to switch via velocity layer.
4.3 Doubled Guitars
Toggle on to achieve an authentic doubling effect with only one Ample Guitar.
The Double knob adjusts the time difference between the notes on the left and right channels.
Preview: Normal, then Doubling.
4.4 Controllable Resonance Sound
Resonance is an indispensable part of the expressiveness and realism of an acoustic instrument. During a live performance, the guitarist controls the volume and duration of resonance manually, Ample Guitar simulates this control.
Preview: Open Resonance, Close Resonance, long Resonance time and short Resonance time modes.
Silent Press(G5), Silent Stroke(G#5) and releasing Hold Pedal can mute ringing resonance.
4.5 Rich Fret Sound
In real performance, hand is constantly moving and touching fretboard. Without fret sound virtual instruments would sound artificially "clean".
Preview: Open Fret Sound, then closed Fret Sound.
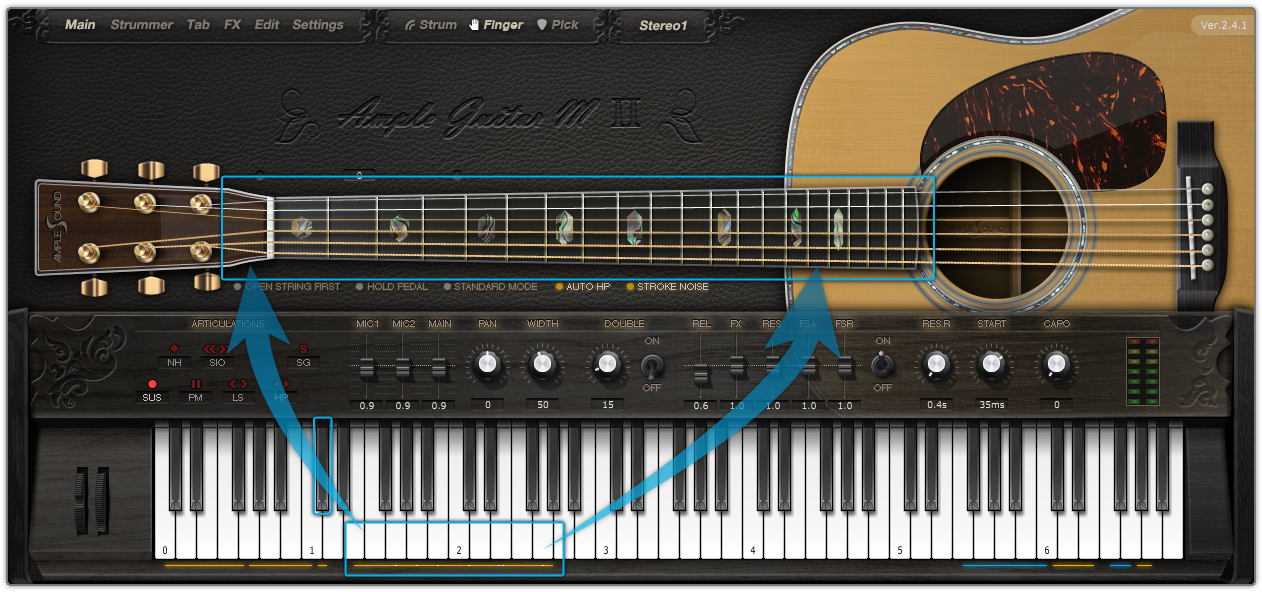
4.6 Global Sample Start Time
After pick strokes string, it takes around 50ms to get the string really vibrating. Ample Guitar preserves the moment of the stroke, otherwise it will sound like piano.
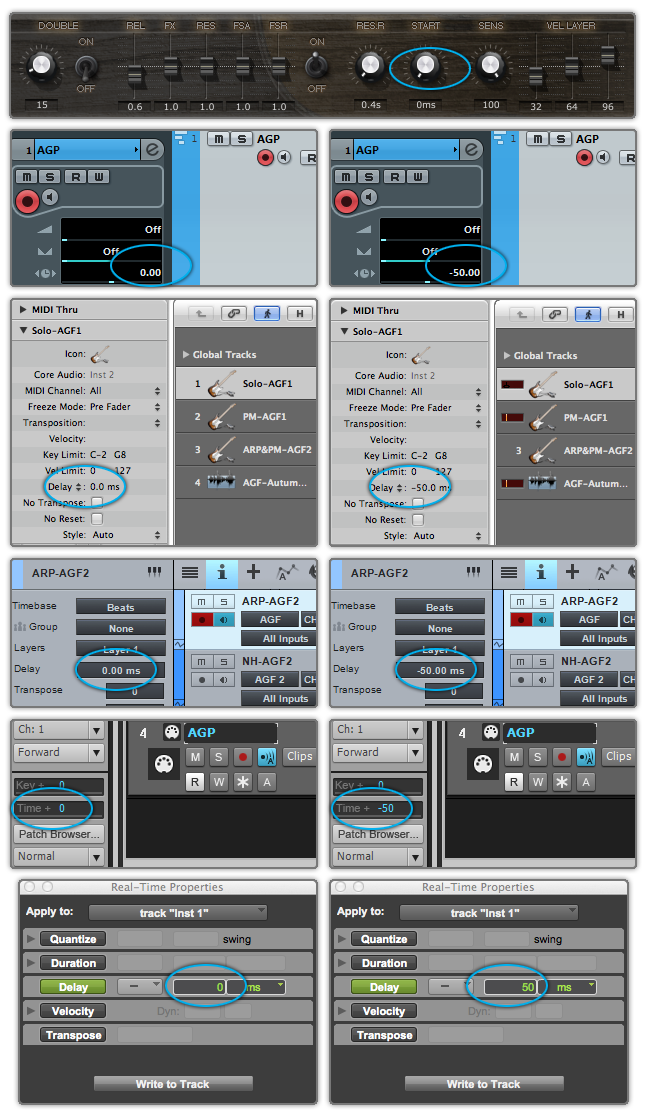
Set Start Time to 50ms and Track Delay of DAWs to 0ms as shown in the figure above on the left for real-time playing.
Set Start Time to 0ms and Track Delay of DAWs to -50ms as shown in the figure above on the right for playback or export.
If your DAW doesn't support Track delay, you will need to drag the track a few ms (according to start time value) forward manually, or use the formula of Time to BPM: Track Delay(beat) = Time(s) * Tempo / 60, e.g. for 50ms, you need to drag a track 0.1 beat or 48 ticks forward when Tempo = 120.
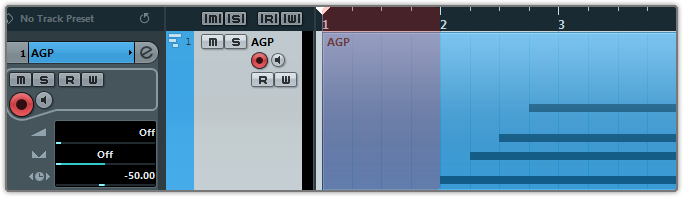
You need to export audio one bar earlier after Track Delay is set as shown in the figure below.
4.8 Manual Vibrato Wheel
Vibrato can be controlled by hand like a real guitarist does. If you want to vibrate automatically, open Settings Panel to toggle on Auto Mod.
4.9 Strman & Capoman
4.9.1 Strman
Specify a string to be played manually. G0-C1 correspond to 6th string-1st string. High velocity StrMan will affect fret position while low velocity will not.
4.9.2 Capoman
Switch to a fret position manually. Press C#1(F0 for Metal) and the CapoMan line (yellow) will appear. Then press E1-C3 to switch to position 0-20 respectively. For metal, press C1-E2 to switch to position 0-16 respectively.
4.10 FX Sound Group
| Note | FX Sound |
|---|---|
| F5 | Scratch |
| F#5 | Slap |
| G5 | Silent Press |
| G#5 | Silent Stroke |
| A5 | Downstroke 1 |
| A#5 | Upstroke 1 |
| B5 | Downstroke 2 |
| C6 | Upstroke 2 |
| F6 | Hit Top (Open) / Pick Scrape |
| F#6 | Hit Top (Mute) |
| G6 | Hit Rim |
4.11 Poly Repeater
As a simulation of repetitive downstroke and upstroke, you can press D6 and E6 to repeat notes being played or last ended note. Multiple notes are supported.
5.1 Overview of Strummer
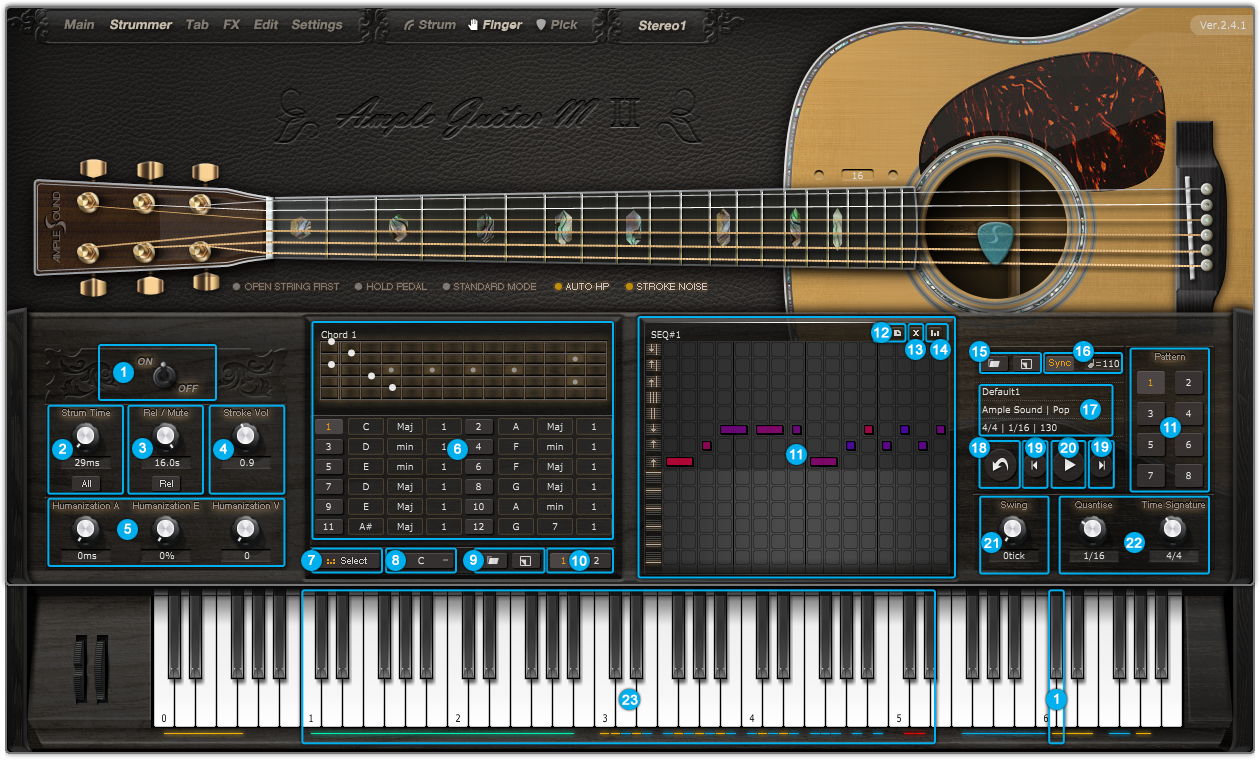
- Strum Mode Toggle(C#6)
- Strum Time (C#5) and Mode
- Body Resonance and Mute Depth
- Stroke Noise Volume
- Strummer Humanizations
- Chord Setting and Switch (Important)
- Switch Chord Mode between Select Mode and Detect Mode
- Transpose Whole Chord Bank
- Save/Load Whole Chord Bank
- Browse Chords 1-12 or 13-24
- Chord Play and SEQ Edit: 14 Strum Notes + 28 Ways to Play (Important)
- Copy Current SEQ from Another
- Clear All SEQ Notes
- Default SEQ Note Velocity
- Save/Load Pattern
- SEQ Sync
- Pattern Information
- SEQ Export to MIDI
- Previous/Next Pattern
- SEQ Play
- SEQ Swing
- SEQ Quantize and Time Signature
- Strummer Keys
5.2 Strum Time and Mode
Strum Time controls how fast pick cross strings. When Strum Time is 1000ms, in Each Mode every interval between chord notes is 1000ms while in All Mode intervals are altogether 1000ms.
Note C#5 can control Strum Time. Higher the velocity, shorter the time.
5.3 Body Resonance and Mute Depth
There are two ADSRs in strum mode, Body Resonance and Mute Depth. Body Resonance simulates open strum, higher the value longer the ringing time. Mute Depth simulates mute strum, lower the value greater the depth.
5.4 Strummer Humanizations
5.4.1 Humanization(All)
Applies random change to total strum time.
5.4.2 Humanization(Each)
Alters the timing of chord notes without affecting total strum time.
5.4.3 Humanization(Velocity)
Randomly assigns variations in note velocities.
5.4.4 SEQ Swing
Randomly flexes the timing grid to avoid a mechanical sounding performance.
5.5 Chord Setting and Switch (Important)
There are two chord modes available, select mode and detect mode. Note D5 can switch chord mode, high velocity for detect mode and low velocity for select mode.
* High-velocity switching chords automatically mutes the ringing of the last chord played.
5.5.1 Select Mode
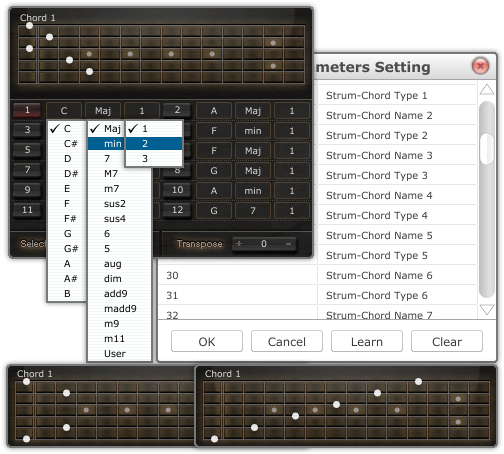
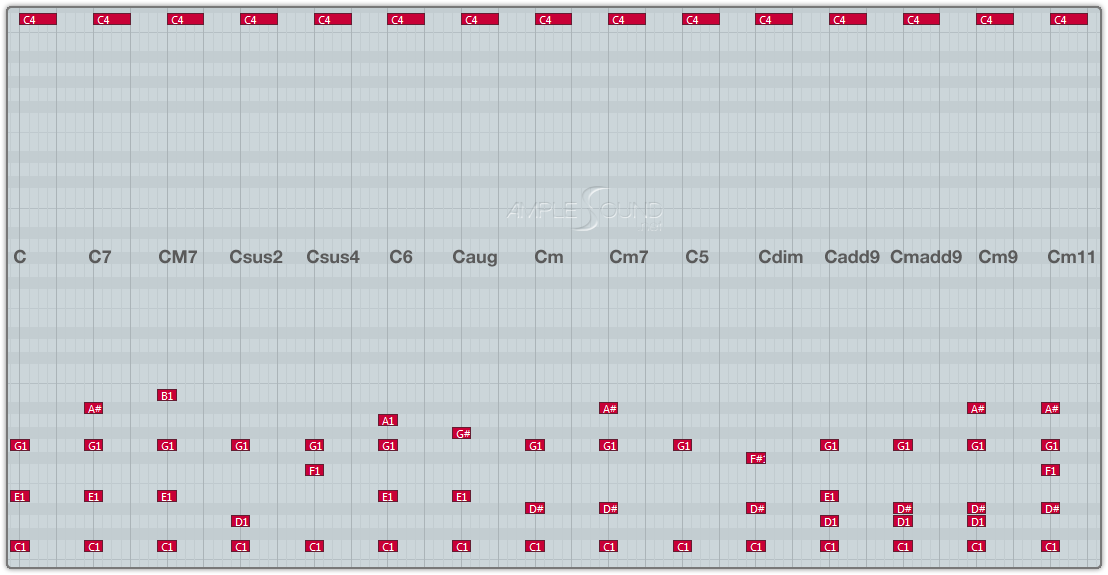
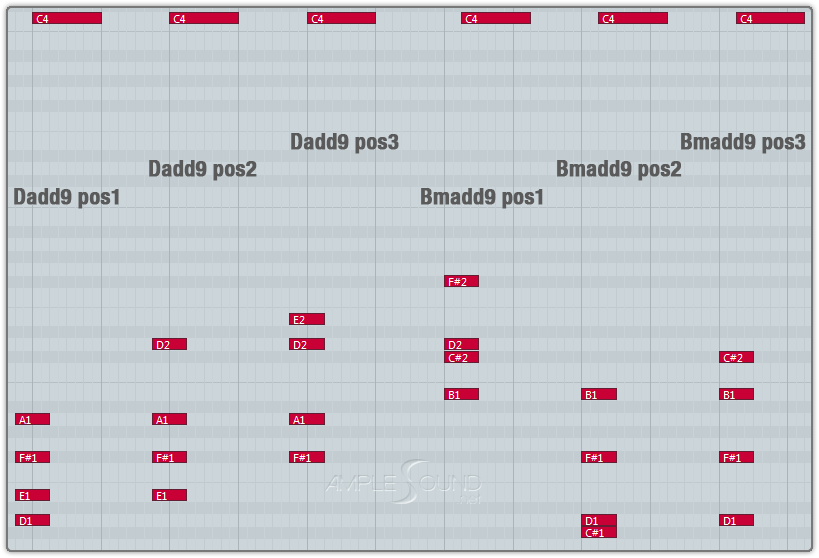
Select Mode provides 24 chord slots. Every chord slot can be customized by setting root note, type and position, altogether 540 variations available. You can also customize by clicking on the fretboard.
Press C1-B2 to switch to chord slot 1-24 respectively. Chord switch with high velocity will mute the ringing of previous chord.
Click Transpose button will transpose 24 chord slots altogether.
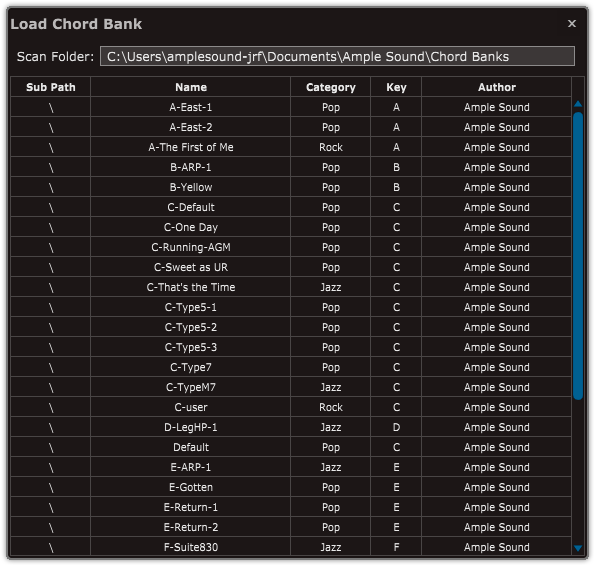
Click Load button to browse and load whole chord bank. Click Scan Folder to change folder.
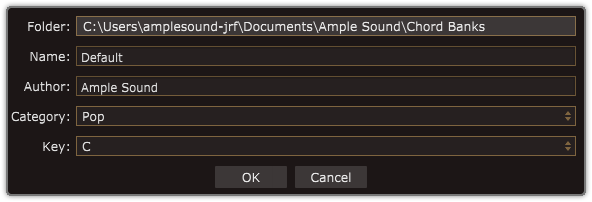
Click Save button to save whole chord bank.
5.5.2 Detect Mode
Detect Mode can detect chord pressed by users within C1-B2 and directly switch to corresponding preset. Root note must be within C1-B1.
Chord Inversion is supported. Different inversions will be mapped to different positions.
Pressing C1-B1 or C2-B2 solely can make a slash chord based on current.
5.6 Chord Play and SEQ Setting (Important)
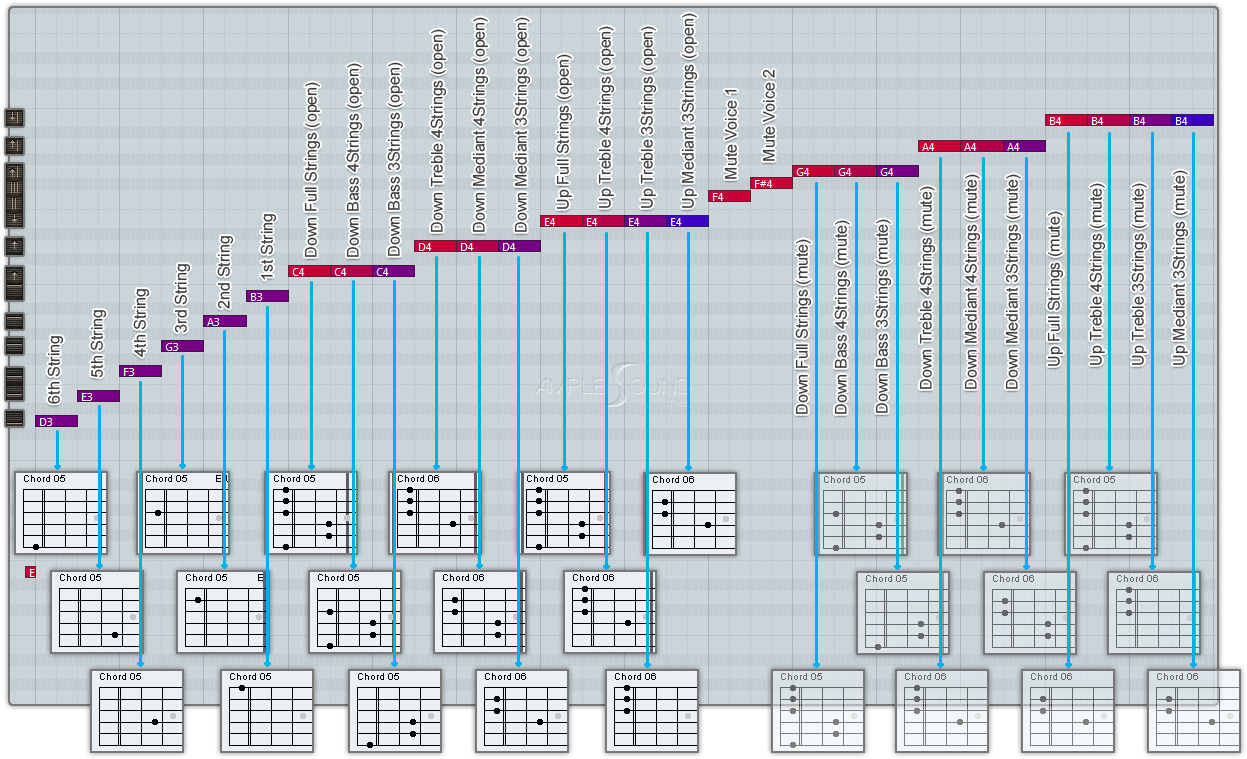
5.6.1 14 Strum Notes + 28 Ways to Play (Original)
Strummer system provides 14 strum notes, and 28 ways to play when combined with different velocity, giving great variety for chord play, even with only one chord.
28 ways to play have been designed and arranged for convenience concern after countless hours of testing. Without need for remembering them, you can play naturally on keyboard to achieve realistic strum.
Figure below shows 28 ways to play with Em chord (6 Notes).
5.6.2 SEQ Edit
Click 8 SEQ buttons to browse and edit SEQs.
The icons on the left of editor are 14 strum notes.
Click  to clear current SEQ notes; Click
  to copy another SEQ to current;
Click
to copy another SEQ to current;
Click  to select default velocity of SEQ note.
The color of SEQ note indicates velocity. Dragging mouse up/down or left/right will change the velocity and/or duration. Single clicking will enter a note. Double clicking on an existing note will remove it.
5.6.3 Save/Load Pattern
Click Load button to browse and load pattern. Click Scan Folder to change folder. Select Category, Time Signature or type to filter patterns.
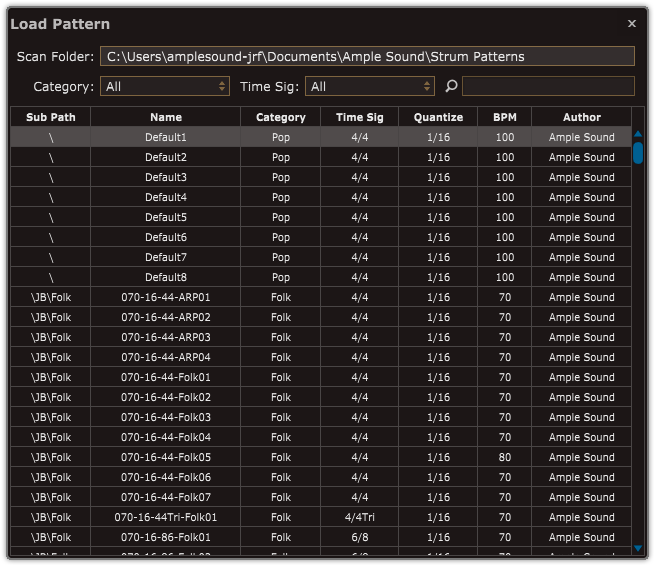
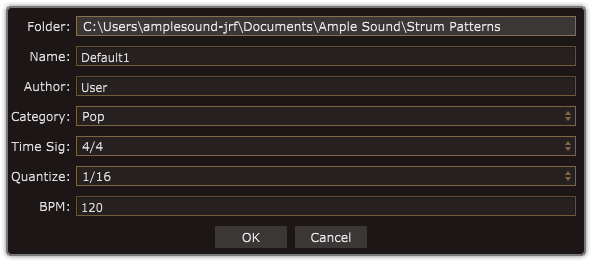
Click Save button to save pattern.
5.6.4 SEQ Playing
Press C3 C#3 D#3 F#3 G#3 A#3 C#4 D#4 to play SEQ 1-8 respectively.
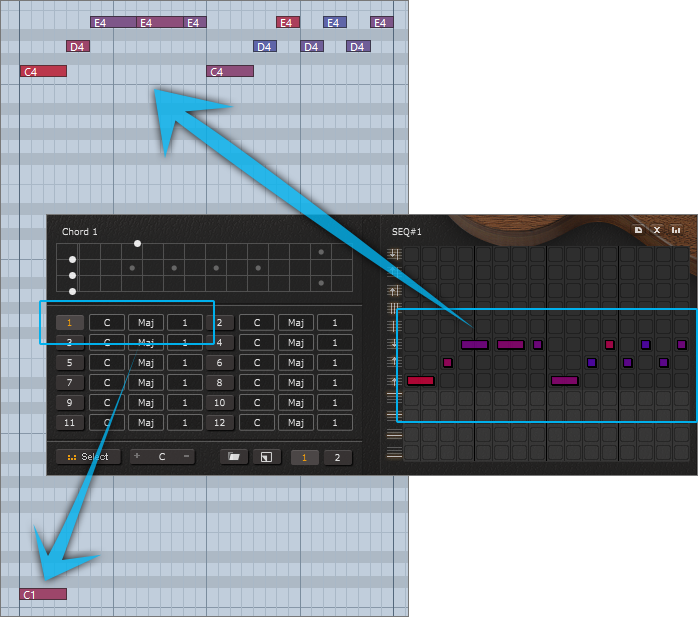
5.6.5 SEQ Export
Drag export button to export current SEQ to host.

Transfer rhythm and chord to MIDI notes.
5.7 Strum with Articulations (Original)
By combining articulation keyswitches and chord switch keys, you can play Natural Harmonic, Palm Mute, Slide In & Out, Legato Slide, Hammer-On & Pull-Off and Pop while strumming.
5.7.1 Strum Legato - Legato Slide
Press E0 and switch to another chord during a strum note, a slide will be made by notes of previous chord and current chord which are on same string but different frets.
5.7.2 Strum Legato - Hammer On & Pull Off
Press F0 and switch to another chord during a strum note, a HP will be made by notes of previous chord and current chord which are on same string but different frets.
5.7.4 Harmonic Strum
Press C#0 before a strum note will make a Natural Harmonics strum, only available on 3rd, 5th, 7th, 9th and 12th fret.
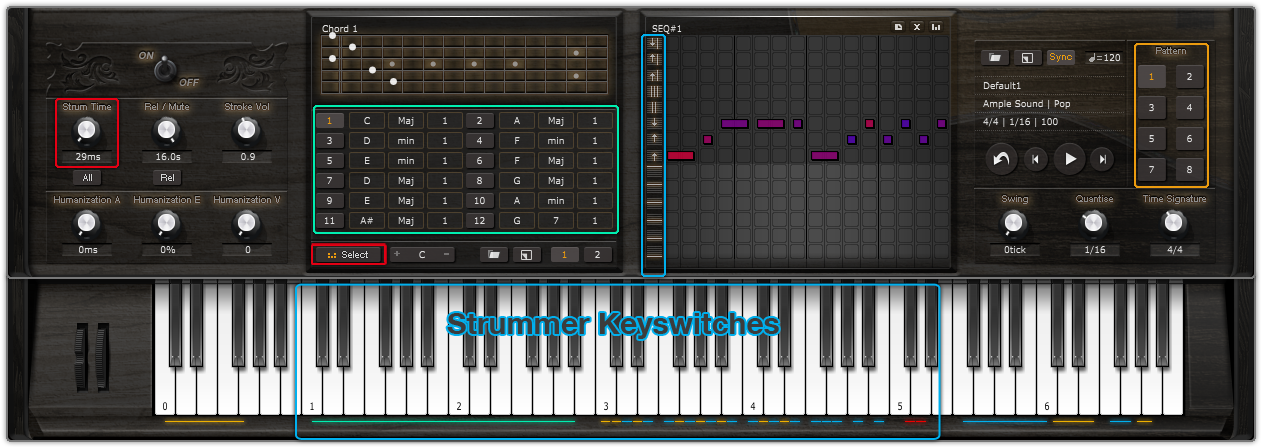
5.8 Strummer Keyswitches (Important)
Green: Chord switch (select mode) or detect (detect mode). Yellow: SEQ triggers. Blue: Strum notes. Red: Chord Mode switch and Strum Time control.
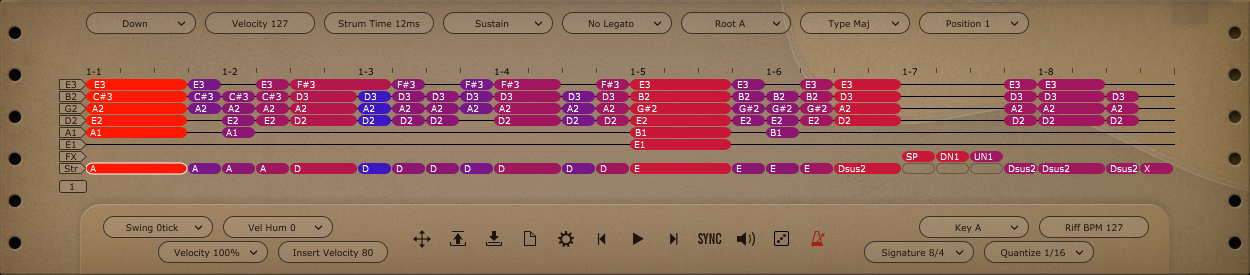
6.1 Overview of Riffer Panel
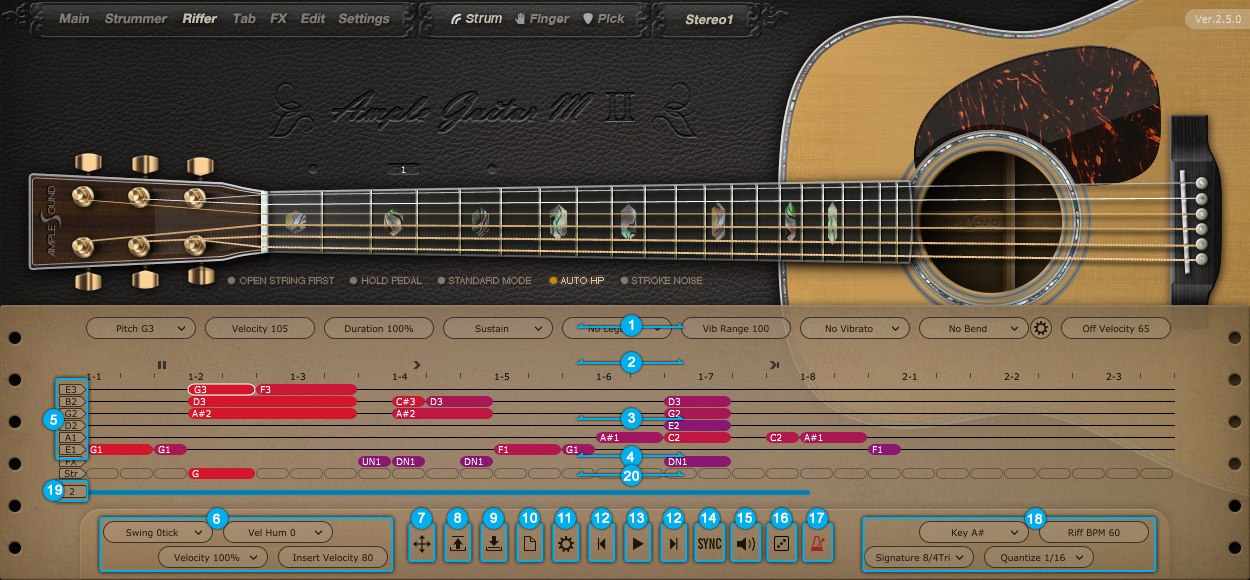
- Note Properties Line
- Expression Line
- String Roll
- FX Noise Line
- Tuner: The Pitch of Each Open String
- Global Properties
- Drag MIDI to Host
- Load
- Save
- New Riff
- Preference
- Previous and Next Riff
- Play Toggle
- Sync Toggle
- Acoustic Feedback
- Dice - Random Riff Generator
- Metronome
- Score Properties
- Measures and Scroll Bar
- Strum Line
6.2 Operation
6.2.1 Operation and Key Commands
| Left click | Enter a note on strings or FX-line |
| Left click the note | Select note |
| Left click anywhere when the note has been selected | Cancel the selection |
| Double Click the note | Delete Note |
| Right Click the note (or Alt\Option + Left Click) | Right-Click Menu |
| Drag the note vertically | Change Pitch |
| Drag the border of note horizontally | Change Length |
| Ctrl + Drag the note vertically | Change Velocity |
| Ctrl + Drag the border of note horizontally | Change Duration |
| Shift + Drag the note | Move Note |
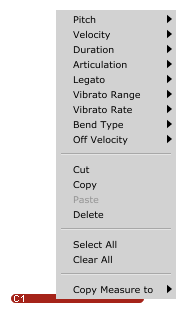
6.2.2 Right-Click Menu
You can do Cut, Copy, Paste, Delete, Select All, Clear All and Copy Measure on the Right-Click Menu, and change note properties if select the note.
6.2.3 Riff Play Toggle
The keyswitch is A#6(high velocity on and low velocity off), The playing position from the selected note.
6.3 Note Properties
6.3.1 Note Properties
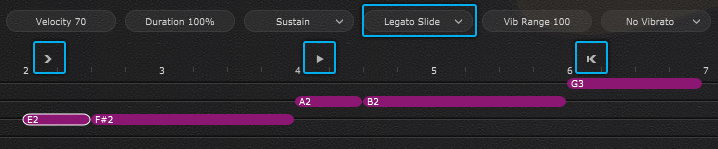
Select a note, the title area will be replaced by note properties. Pitch, Velocity, Duration, Articulation, Legato, Vibrato Range, Vibrato Rate, Bend Type, Bend Rate, Note Off Velocity, altogether 10 options for each note.
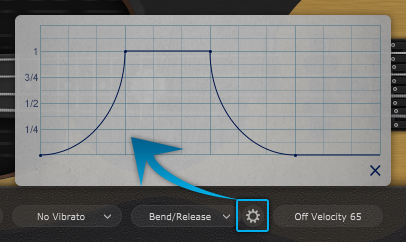
6.3.2 Bend Editor
Every points you can drag to change the Bend Rate.
6.3.3 Note Off Velocity
Control the volume of Release and Fingered Release.
6.4 Expression
6.4.1 Icon Position
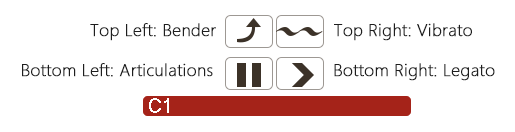
6.4.2 Icons of Articulations & Legato
| Articulation | Guitar | Bass | |
 |
Nature Harmonic | All Guitars except AME | All Basses except AMR |
 |
Palm Mute | All | All |
 |
Slap | -- | Electric Basses and ABA |
 |
Pop | All | Electric Basses and ABA |
 |
Tap | -- | Electric Basses |
 |
Staccato | AGG, AGP and AGF | ABP and ABJ |
  |
Slide In & Slide Out | All | All |
  |
Hammer On & Pull Off | All | All |
  |
Legato Slide | All | All |
 |
Bender | All | All |
 |
Vibrato | All | All |
 |
Slide Guitar | AGP, AGF, AGG, AGM and AGT | -- |
*The articulations and Legato are different in different instruments.
6.4.3 Articulation & Legato Rules
● Legato is available when notes are next to each other and on the same string, the Legato must be marked on the first note.
The speed of long legato slide (slide more than 2 frets) is determined by the velocity of destination note. Higher the velocity, faster the speed.
● Slide Out: Slide Out from the 50% point of the note;
1/4 Slide Out: Slide Out from the 75% point of the note;
1/8 Slide Out: Slide Out from the 87.5% point of the note.
● Nature Harmonic is available on the nature harmonic positions (5th, 7th, 9th and 12th fret), the pitch is the same as Sustain.
● Slap or Pop dead note is available when switching to Slap or Pop, and the velocity is 1 - 63.
● Pop Slide In is available when switching to Slide, and the velocity is 127. (ABY only)
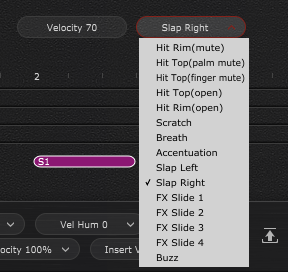
6.5 FX Line
6.5.1 Articulation & Legato Rules
Select a FX note, there are Velocity and FX type(pitch) 2 options for each FX note.
*The FX type is different on different instruments.
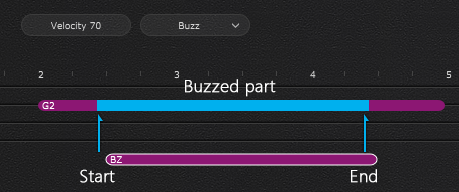
6.5.2 Buzzing
6.6 Score & Global Parameters
6.6.1 Global Parameterss
| Swing tick | - |
| Velocity Humanization | If the velocity is 80 and set Velocity humanization to +/-20, the value will be 60 - 100 |
| Velocity Proportion | Controls the percentage of original velocity with which to play |
| Insert Velocity | Default Note Velocity |
6.6.2 Score Parameters
| Key | Transpose the key of Riff |
| Time Signature | Follow Global Time Signature when SYNC is on |
| BPM | Follow DAW's BPM when SYNC is on |
| Quantize | Follow Global Quantize when SYNC is on |
6.7 Import & Export
6.7.1 Import MIDI and Tab to Riffer
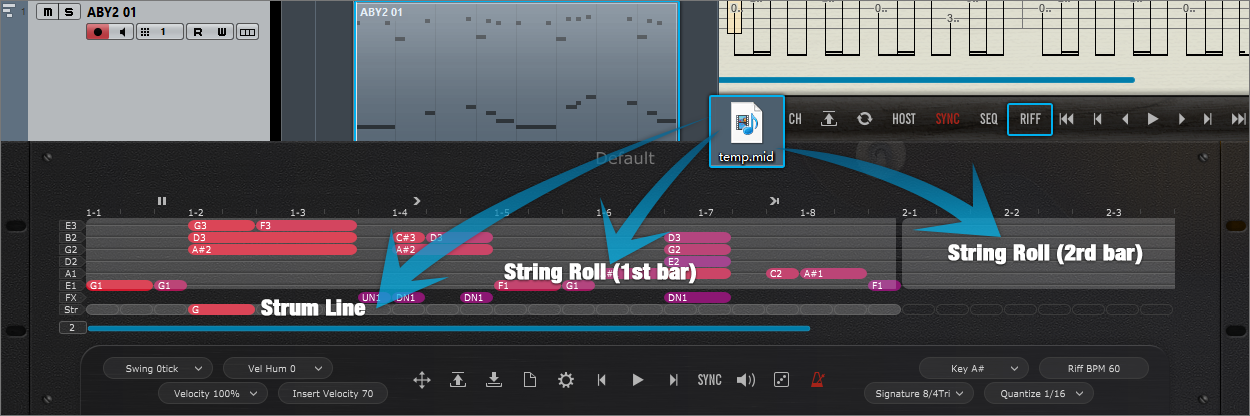
The MIDI file could be imported to Riffer, the MIDI format must be MIDI 0 or MIDI 1, and make sure that there is only one track in the MIDI file.
*The MIDI block could be dragged into Riffer directly only in Cubase & Nuendo.
Click Riff button on the Tab panel, the current measure could be converted to a riff, and all of articulations and fingered positions will be kept.
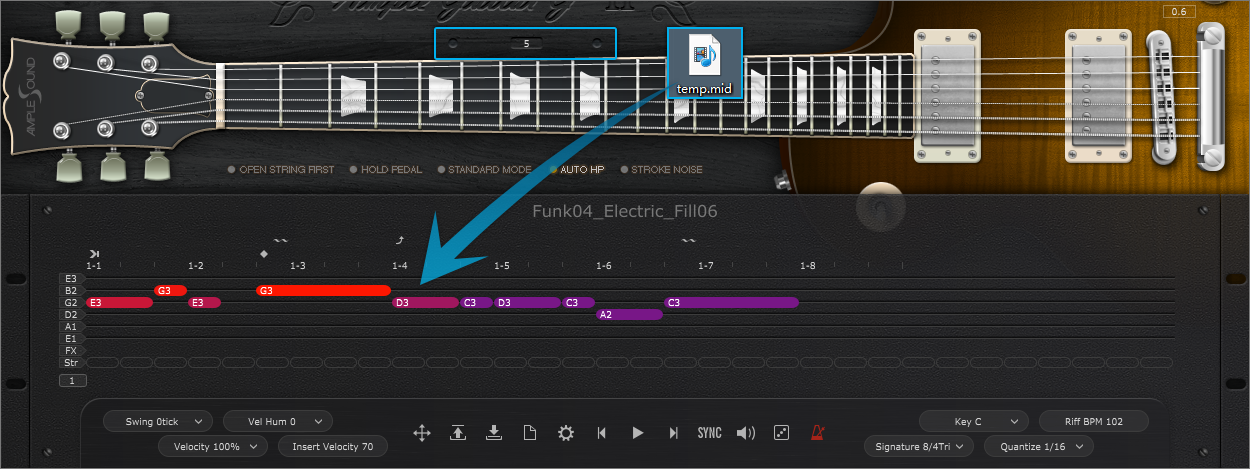
Click on the virtual fingerboard to set a capo then import the MIDI, the notes could be in the correct positions.
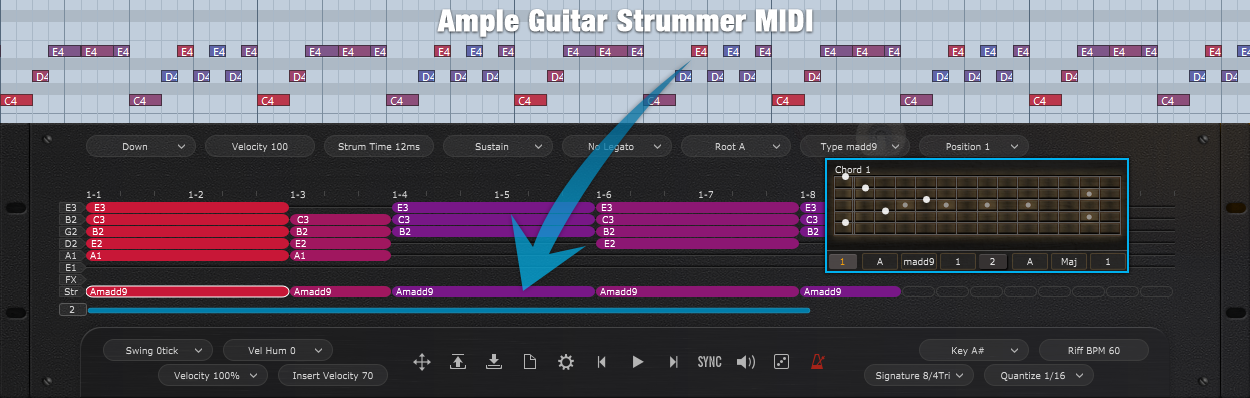
Set a chord on Strummer then drag the Strummer MIDI to Riffer Strum Line, the Riff could be the same as imported MIDI.
6.7.2 Export Riff to MIDI
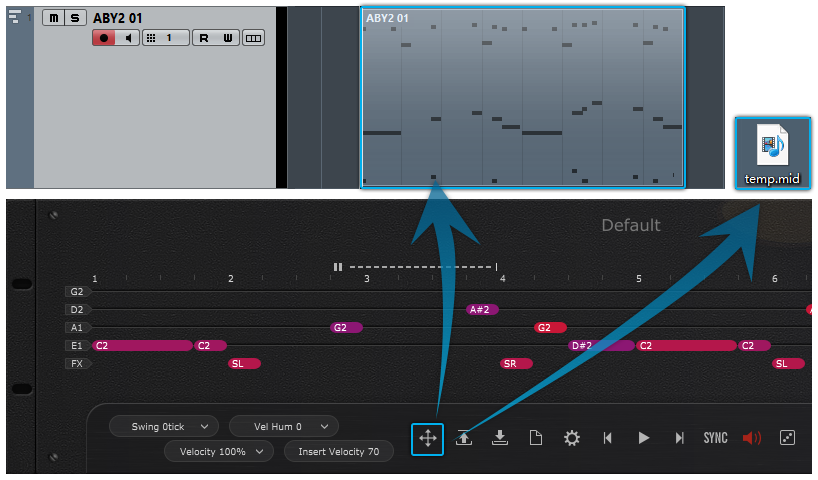
Drag the riff to MIDI track, or generate a MIDI file
*The Export Mode and Export Humanization could be changed on the Preferences window, refer to section 6.9.
6.8 Preset & Save Window
6.8.1 Preset Window
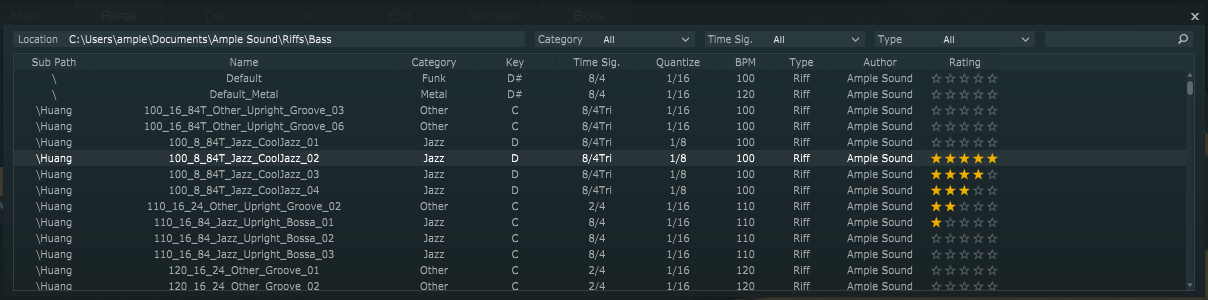
Check all of attributes (Category, Time Signature, Key, Quantize, BPM, Type and Author), sort presets according to an attribute, search and rate presets.
*Right click can remove rating.
6.8.2 Save Window
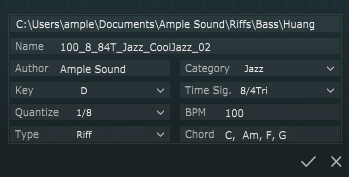
*Separated by commas if more than one chord.
6.9 Preferences
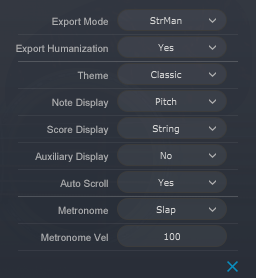
| MIDI Export mode | Strman: Exported MIDI will contain keyswitch\Strman information, Available for all DAWs; Channel: Exported MIDI will contain channel information, this will also toggle on MIDI guitar mode on Setting panel. Make sure the input channel of MIDI track is set to Any, Not available for some DAWs such as Pro Tools, Ableton Live etc |
| Export Humanization | Determines if exported MIDI will include Swing, Velocity Humanization, and Velocity Proportion settings |
| Theme | Classic Dark |
| Note Display | Select information to be shown on top of notes Fret Pitch Pitch & Fret Velocity Duration Off Velocity |
| Score Display | Score Line Display String Grid |
| Auxiliary Display | Auxiliary grids for FX-line and note attributes |
| Auto Scroll | Auto Scroll druing the playback |
| Metronome | Change the sound of Metronome |
| Metronome Velocity | Change the volume of Metronome |
6.10 Dice
Dice is a Random Riff Generator, The keyswitch is B6.
6.10.1 Guitar Dice
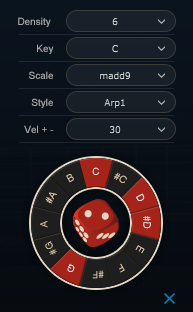
| Density | Numbers of note to generate, in time signatures other than 4/4, the same ratio will be kept. |
| Key | Root note |
| Scale | Select a chord template |
| Style | Notes and Groove style |
| Vel+- | Random Velocity Range |
| Dice | Create a random riff |
6.10.2 Bass Dice
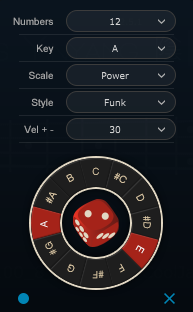
| Numbers | Numbers of note to generate |
| Key | Root note |
| Scale | Select a chord or Scale template |
| Style | Notes and Groove style |
| Vel+- | Random Velocity Range |
| Dice | Create a random riff |
| Record | MIDI input on/off |
6.11 Measure Setting
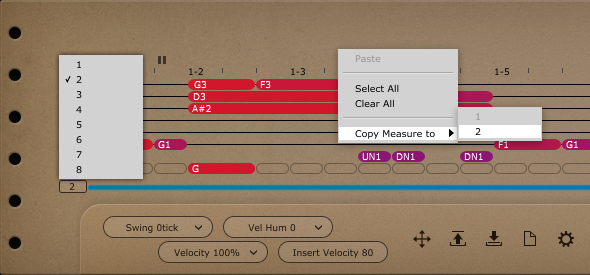
Set multi measures for the riff(up to 8) and duplicate all of notes in current measure to another measure.
6.12 Strum Line(Guitar only)
Select a strum note, the title area will be replaced by strum note properties. Direction, Velocity, Strum Time, Articulation, Legato, Chord Root, Chord Type and Position altogether 8 options for each strum note.
All of notes in the chord will be changed if anyone option of chord note is changed.
7.1 Overview of Tab Player Panel
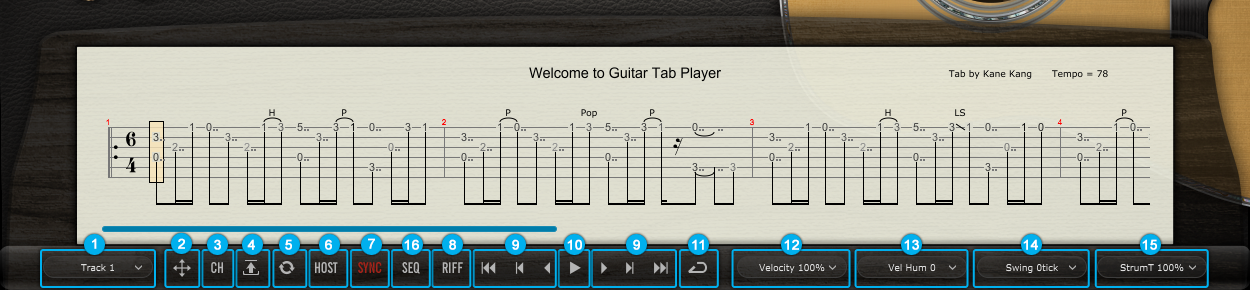
- Track Select
- Tab Export to MIDI and Export Mode
- Load Tab
- Refresh the Tab
- Host Playback Toggle
- Tab Sync
- Convert Current Measure to Strummer
- Go to ...
- Tab Play (Note A6)
- Go to ...
- Tab Loop
- Velocity Proportion
- Velocity Humanization
- Tab Swing
- Strum Time Proportion
- Convert Current Measure to Riffer
7.2 Tab Load
Ample Guitar supports four formats of tab, GP3, GP4, GP5 and GPX. After you edit a tab, you can click Reload button to refresh. Click on edge or "Go to..." buttons to browse tab.
7.3 Tab Play
Click the play button to play a tab. When loop toggle is on, tab will start over again when it reaches end. When loop toggle is off, tab will stop. A6 can toggle on tab play with high velocity and off with low velocity. Use A6 to control tab play when exporting.
7.4 Tab Export
Drag export button to export tab to host as midi file. When Export Mode is Channel Mode, exported midi will contain channel information. This will also toggle on Midi Guitar Mode on Settings Panel. Make sure the input channel of midi track is set to all. This mode is not available for some DAWs such as Pro Tools, Ableton Live, etc. When Export Mode is StrMan Mode, exported midi will contain StrMan information. This mode is available for all DAWs.
7.5 Host Playback
When toggled on, tab can respond to host playback. Make sure the time signatures of host and tab are same.
7.6 Velocity Proportion and Humanization
Velocity Proportion controls the percentage of original velocity with which to play tab. Humanization applies random change to velocity.
7.8 Strum Time Proportion
Controls the percentage of original strum time with which to play tab. When set as "Fixed by Strummer"��strum time will be fixed by the strum time knob on strummer panel.
8.1 Overview of FX
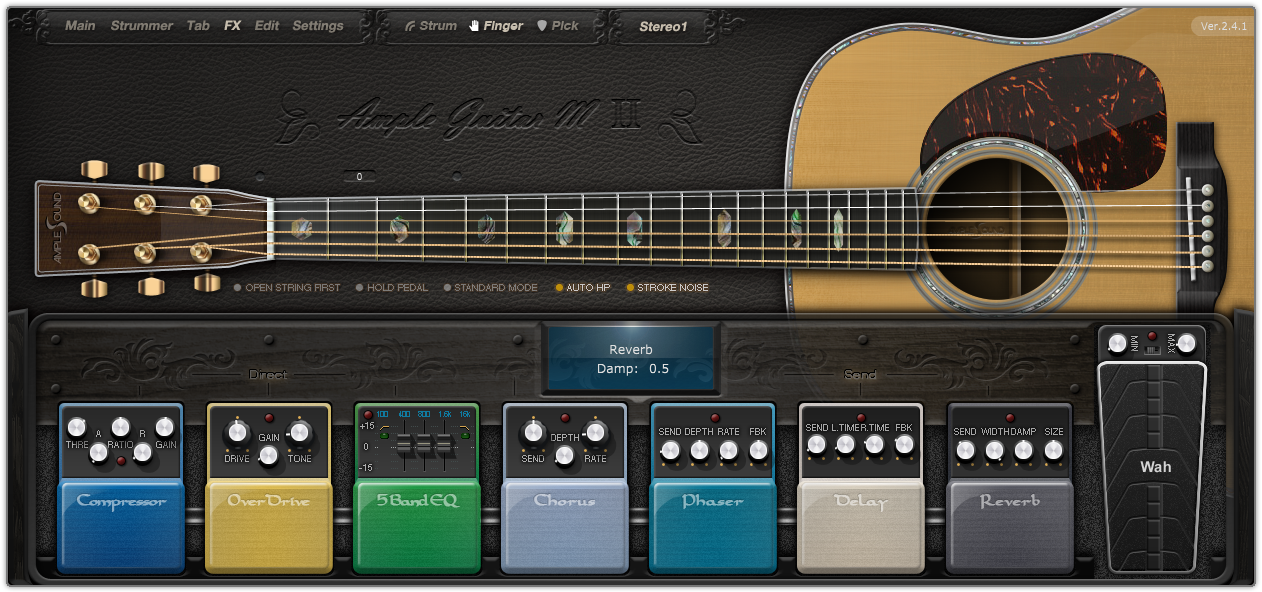
4 Send FXs: Reverb, Delay, Phaser, Chorus. 4 Direct FXs: Compression, Overdrive, 5-Band-EQ, Wah.
8.2 Compression
| Name | Range | Default Value | Unit |
|---|---|---|---|
| Thre | -60 - 0 | -20 | db |
| Ratio | 0 - 1 | 0.5 | - |
| Attack | 1 - 500 | 5 | ms |
| Release | 5 - 500 | 50 | ms |
| Gain (MakeUp) | -24 - 24 | 2 | db |
8.3 Overdrive
| Name | Range | Default Value | Unit |
|---|---|---|---|
| Drive | 10 - 1000 | 150 | - |
| Gain | 0 - 0.2 | 0.1 | - |
| Tone | 1000 - 12000 | 4000 | HZ |
8.4 5-Band-EQ
| Name | Range | Default Value | Unit |
|---|---|---|---|
| Lo Cut Active | Off / On | On | - |
| Lo Cut Gain | -12/-24 | -12 | db |
| Lo Cut Freq | 20 - 20k | 100 | Hz |
| Band 2 Gain | -15 - 15 | 0 | db |
| Band 2 Freq | 20 - 20k | 200 | Hz |
| Band 3 Gain | -15 - 15 | 0 | db |
| Band 3 Freq | 20 - 20k | 800 | Hz |
| Band 4 Gain | -15 - 15 | 0 | db |
| Band 4 Freq | 20 - 20k | 1.6k | Hz |
| Hi Cut Active | Off / On | Off | - |
| Hi Cut Gain | -12 / -24 | -12 | db |
| Hi Cut Freq | 20 - 20k | 16k | Hz |
8.5 Wah
| Name | Range | Default Value | Unit |
|---|---|---|---|
| Min | 100 - 200 | 100 | - |
| Max | 5000 - 10000 | 5000 | - |
| Pedal | according to Max and Min | = Min | - |
8.7 Phaser
| Name | Range | Default Value | Unit |
|---|---|---|---|
| Send | 0 - 1 | 0.2 | - |
| Depth | 0 - 1 | 0.5 | - |
| Rate | 0 - 10 | 5 | - |
| FBK | 0 - 1 | 0.5 | - |
8.8 Delay
| Name | Range | Default Value | Unit |
|---|---|---|---|
| Send | 0 - 1 | 0.1 | - |
| L.Time | 0 - 2 | 0.25 | beat or s |
| R.Time | 0 - 2 | 0.5 | beat or s |
| FBK | 0 - 1 | 0.2 | - |
| Time Mode | Bpm / Time | Bpm | - |
8.9 Reverb
| Name | Range | Default Value | Unit |
|---|---|---|---|
| Send | 0 - 0.5 | 0.1 | - |
| Width | 0 - 1 | 1 | - |
| Damp | 0 - 1 | 0.3 | - |
| Size | 0 - 1 | 0.8 | - |
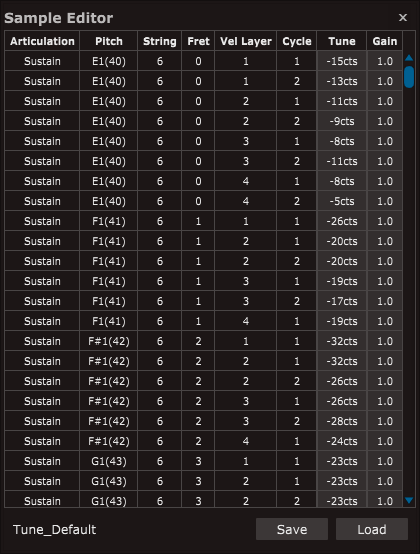
9 Edit Panel
You can adjust both pitch and gain of every sample according to your own need. Editor can correspond to sample currently being played. You can save your tune setting for later use or load setting from file.
- Copyright 2012-2025 © Beijing Ample Sound Technology Co. Ltd. All rights reserved.
-


